Detecting and monitoring existing Lustre file systems
A Lustre file system that was created without using Integrated Manager for Lustre software can be monitored, but not managed, from the manager GUI.
Before an existing Lustre file system can be monitored at the manager GUI, the servers must be added and then the file system detected by the manager.
Detect file system
To make the Lustre file system appear on the Dashboard and Configuration > File System windows in the manager GUI, complete these steps:
- At the menu bar, click Configuration > Servers and click Detect File Systems. A dialogue window listing hosts is displayed.
- Select ALL of the servers on which the targets for the file system to be detected are running. Do this for the MGS and all OSSs for this file system, including those OSSs that were already present in this file system. Do NOT add servers that you don’t want to add to this file system.
- Click Run. A Command detail dialogue window appears showing progress. Status shows Successful when the process is complete.
Note: Due to a known issue, the software may report that the file system you added was not detected. However, you can confirm the creation of the file system.
You can add more servers and add more targets to an existing monitored-only file system. To do this, add servers using the monitored-only profile. Next, detect the entire file system again, using the steps above.
Note: To be detected, the file system must be running.
Note: To view the Command Detail after detection completes, click on Notifications on the left side of the screen and select Commands at the bottom of the notifications list. To the right of the Detecting file systems command, click Open.
The Lustre file system is now ready to be monitored in the manager GUI.
Add OSTs and OSSs to a monitored file system
This procedure applies to an existing file system that is monitored only.
To begin, first add the new OSS and OST(s) to your Lustre file system via the command line. See the Lustre Operations Manual, for detailed instructions for adding OSS and OST(s) to an existing file system. Then, to add one or more servers hosting the new OST(s) perform the following steps.
-
At the menu bar, click the Configuration drop-down menu and click Servers to display the Servers Configuration window.
Note: All authentication credentials are sent to the manager server via SSL and are not saved to any disk.
- Click + Add Servers.
-
In the Hostname / Hostlist Expression field, enter the name of the server(s) to be added. You can enter a range of names, a “host list expression”. For example, your can enter server[00-019] to generate a list of up to twenty servers (in this case).
Note: These are all the server names that your expression expands to and may include names for servers that don’t exist or are not connected to the network.
- Select an authentication method:
- Click Existing Key to use an existing SSH private key present on this server. There must be a corresponding SSH public key on each server you are adding.
- Click Root Password and enter a root password for the server you are adding. This is standard password-based authentication. It is not uncommon to use the same root password for multiple servers.
- Click Another Key and enter a private key that corresponds to a public key present on the server you are adding. If the key is encrypted, enter the passphrase needed to decrypt the private key.
- Click Next.
- The software will attempt to verify the presence and readiness of all servers with names matching your hostname entry. Each server is represented by a square. A green square means that the server passed all readiness tests required for validation and this process can proceed for that server. A red box means that the server failed one or more readiness tests. Click on a red box to learn which tests the server failed. You can hover the pointer over the failed validation test to learn more.
-
For a server that failed validation, log into that server and work to address the failed validation. When the issue has been resolved, the GUI will update the failed validation test in real time, from a red x to green check mark. You can add the server when all failed validations are resolved.
Note: Many server names may be generated from your host list expression, and some of those servers may not exist. A red box is created for each server that doesn’t exist.
-
Assuming that all servers pass the validation tests and all boxes are green, click Proceed to download agent software to each server. If one or more servers failed to pass validation tests, the green Proceed button changes to a yellow Override button. Clicking Override displays this warning: You are about to add one or more severs that failed validation. Adding severs that failed validation is unsupported. Click Proceed to continue.
Caution: Although you can attempt to add a server that has failed validation, all of the capabilities exercised by the tests are needed for the management software and server to operate normally. The server will likely fail to operate normally. Adding a server that failed validation is not supported.
- After clicking Proceed, agent software is deployed to each server and a Commands window opens to show progress. Click Close to close this Commands window.
- If you decided to override servers that failed validation tests (not supported), expand any failed commands in the Commands window. Click on any failed jobs and examine the stack trace to learn the cause of the failure. Correct the cause of the failure and close the command and server windows. If the server exists in the server table, click Actions and select Deploy Agent. Otherwise open the Add server dialog and enter the failed server. In either case you should now see a green square for that server and be able to add it without an issue.
-
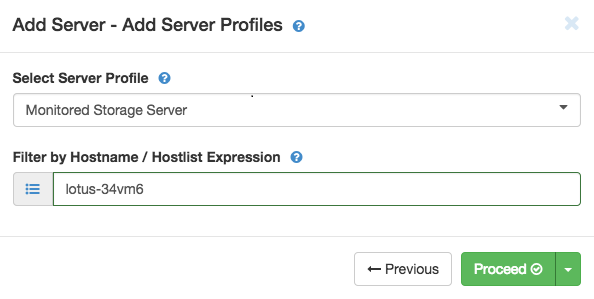
The next task is to add a server profile to each server. Select the desired profile from the drop-down menu. Note that one profile type is selected for all servers you are adding in this process.
Select Monitored storage server: This is for servers that are not configured for HA/failover (as far as this software is concerned). A monitored storage server is monitored only; the manager GUI performs no such server HA configuration or management. However, the Dashboard will still display charts showing file system operations. In the image below, the Hostname is an example only.
- Click Proceed. The manager does an audit of the storage resources on each server. The manager then provisions the server by loading appropriate Lustre modules and making sure the Lustre networking layer is functioning. When all checks are completed, LNet State indicates LNet Up and each server is fully qualified as a Lustre server. Under the Status column, a green check mark is displayed for each new server. If server provisioning does not succeed, the Status will indicate a exclamation mark (!) and the LNet State may indicate Unconfigured. To learn the cause of the problem, click the exclamation mark for the failed server to see Alerts. For more information, click Status at the top menu bar. The Status window also lets you view related logs.
- You can proceed to add more servers. Otherwise, click Close.
- When all the servers for a monitor-only file system have been added and configured using the manager GUI, at the menu bar, click Configuration > Servers and click Detect File Systems. A windows shows all detected hosts.
- Select ALL of the servers on which the targets for the file system to be detected are running. Do this for all OSSs for this file system, including those that were already present in this file system. Do NOT add servers that you don’t want to add to this file system.
- Click Run. A Command detail dialogue window appears showing progress. Status shows “Successful” when the process is complete.
Note: Due to a known issue, the software may report that the file system you added was not detected. However, if you go to Configuration > File Systems and view the updated file system, the new OSS(S) and target(s) should be listed.